
I have owned off-the-shelf factory rifles that I upgraded over time, and I have also spent good money to have a gunsmith build me a custom rifle. Both of those rifles shoot great, and I have enjoyed using them on many hunts, for hours spent at the range practicing, or just on fun days of shooting steel with buddies.
Between the average hunting rifle, you can find on the shelf of your local sporting goods store and the high-end custom rifles that cost many thousands of dollars, there is a “messy middle” of rifle options.
If you have the budget to spend $2,000-5,000+ when purchasing, building, or upgrading your rifle, you land squarely in this “messy middle” area. This includes high-end factory rifles, semi-custom rifles (such as those from Tenacity Arms), paths to upgrade off-the-shelf rifles, and some of the more affordable custom rifles (at the high end of that budget).
Another option you have is to put together a rifle yourself. Yes, YOU. The non-gunsmith, everyday hunter.
You can “build” a rifle all on your own. And you can build a very good one.
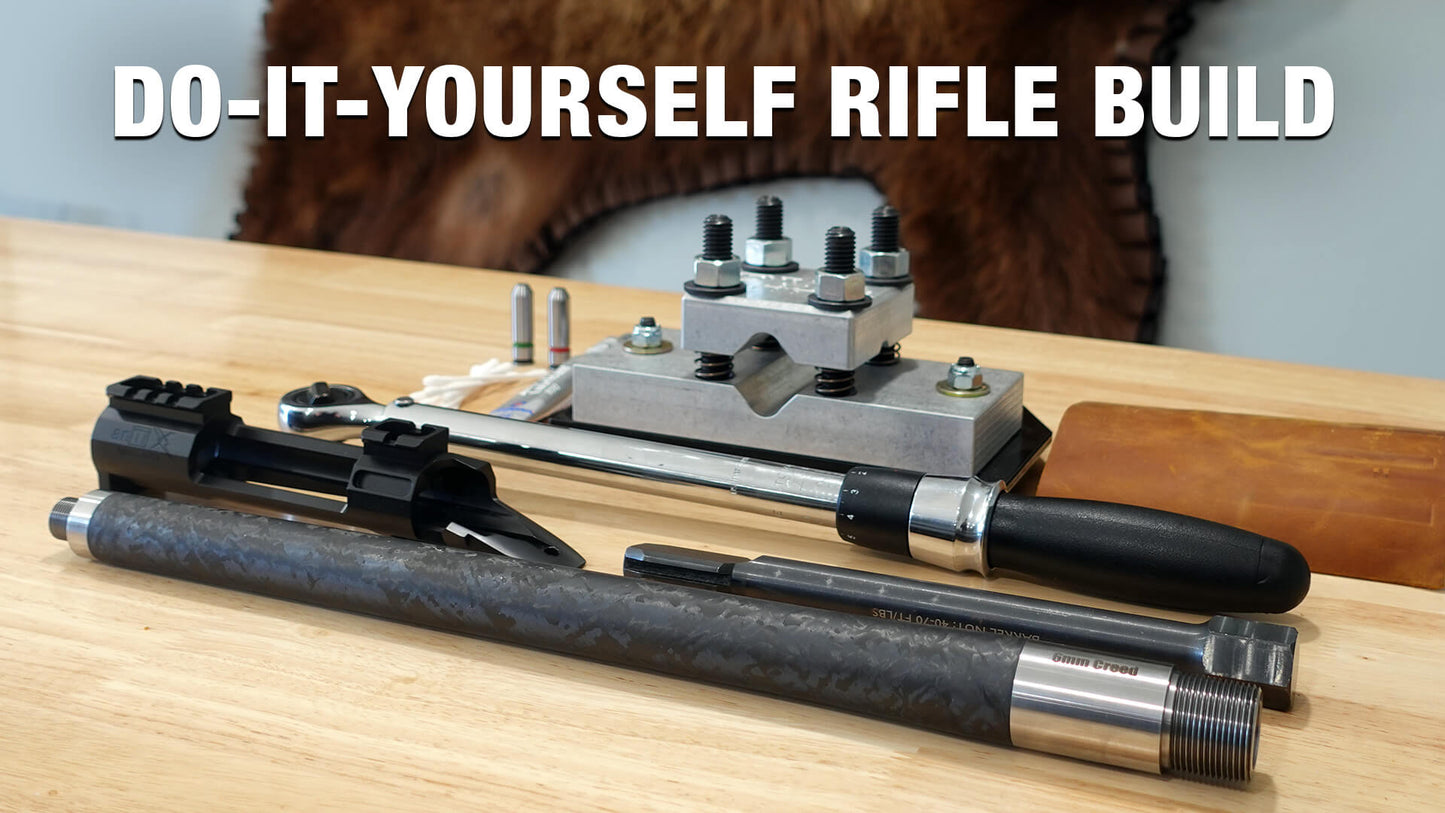
PRE-FIT RIFLE BARRELS
A pre-fit barrel is a ready-to-shoot barrel that can be installed on a rifle action with minimal tools, knowledge, and skills.
That is what we are going to talk about in this article, and it is what we talked about in more depth in Episode 517 of the Hunt Backcountry Podcast with Jaden from West Elk Precision.
This article will cover the highlights of our conversation with Jaden, but we highly recommend listening to that podcast episode to get more details and nuance on what we are covering in this article.
ACTION BEFORE BARREL
First, know that you cannot use a prefit rifle barrel on any rifle action.
Most newer “custom” actions built in the Remington 700 design will accept pre-fit barrels, including many from American Rifle Company, Defiance Machine, Impact Precision, Kelby, Lone Peak, Mack Brothers, Pure Precision (formerly Mesa Precision), and Zermatt Arms (formerly Bighorn).
When it comes to factory rifles that are capable of accepting shouldered pre-fit barrels, your best bet is a Tikka rifle. They are fantastic.
Other rifle platforms allow you to swap barrels, but instead of using a standard “shouldered” barrel, these systems use “barrel nuts” or other proprietary systems for installing their barrels. These include rifles from Savage and Ruger, the Sig CROSS, the Q Fix, and others.
If you are purchasing an action, there are a lot of good options listed above. Based on my independent research and subsequent firsthand experience, I recommend the Zermatt Origin action for the sub-$1,000 price point as a great way to get started at a reasonable price.
And if you, like me, are an ounce-counting hunter who wants to build a lightweight rifle and you have the budget to invest in a high-end action for a lifetime, I choose the Defiance anTi-X action for my primary hunting rifle.
SELECTING A PRE-FIT BARREL
For simplicity's sake, I am going to lump pre-fit barrels into two categories: “off the shelf” pre-fit barrels and “custom” pre-fit barrels.
To explain the difference, let’s look at barrels from Proof Research. They offer prefit barrels for many of the actions and rifles mentioned above. These prefit barrels are chambered in the cartridge of your choice, threaded for the action of your choice, and ready to install. This is a great way to go if the options available meet your needs.
When I was putting together my latest rifle in 6mm Creedmoor, I wanted a short barrel in the 16-18” range. The shortest pre-fit from Proof was 22” for the action options I had available to me, so instead of purchasing a pre-fit from Proof, I went the “custom pre-fit” route by purchasing a barrel “blank” (not a prefit) that was cut for the 6mm bore diameter, but was not chambered in any specific cartridge, nor was threaded for any specific action.
Proof and other barrel makers, such as Bartlein and Benchmark, offer barrel “blanks” in a wide variety of lengths, twist rates, and barrel profiles.
I chose a 16.5” barrel in 6mm (.243”), then sent that blank to Jaden at West Elk Precision and had him “make” a pre-fit for my Defiance anTi-X action. Jaden chambered the barrel for 6mm Creedmoor, cut the barrel threads to fit my action perfectly, and sent me a “custom” ready-to-install prefit barrel on my action at home.
If you want to learn more about the differences between “off the shelf” and “custom” pre-fit barrels, we discuss this in more depth on the podcast (above).

TOOLS TO GET STARTED
So we have an action and a prefit barrel for that action. Now what?
Before we can install the barrel, we need to understand what tools we need. Thankfully, it is a short and simple list…
- Barrel vise
- Action Wrench
- Torque Wrench
- Go & No-Go Gauges
- Anti-Seize
- Q-Tips / Cleaning Patches
There are countless options for vises and wrenches, and this article is meant to cover the basics, so let me just tell you what I have and use. I share these items not because they are the “best”, but because they are good and affordable options for the hobbyist/hunter, which I chose on my independent research and have personally used.
I have the PMA Gen II Barrel vise, mounted via an Inline Fabrication flush bench mount, which allows me to easily swap from using the vise, to a reloading press, to a brass prep station, or other tools.
I have the Zermatt action wrench, which has worked well with my Zermatt Origin action, with my Defiance action, and should work on other Remington 700-based actions.
Go and No-Go gauges can be purchased from a supplier like Pacific Tool & Gauge or rented from ReamerRentals.com.
With those rifle-specific items acquired, now you just need a torque wrench (100ft/lbs or more), a socket fit your action wrench, some anti-seize, and Q-tips.
THE INSTALLATION PROCESS
Instead of writing out all of the installation steps, refer to the video below and listen to the podcast with Jaden (above).
For another installation example, refer to Jaden’s pre-fit barrel installation video.
TIME TO SHOOT (THEN HUNT)
With the barreled action torqued and checked for proper headspace with the Go and No-Go gauges (use gauges, not brass!), it is time to install a trigger, get the barreled action into your stock or chassis, mount your riflescope, and head to the range.
While shooting your first round can be scary, if you have properly torqued your barrel and verified the headspace, then shooting the proper cartridge through your rifle should be perfectly safe.
Now you can see just how simple and easy it is for anyone to put together a hunting rifle with a quality action and a pre-fit barrel.