
Now more than ever, it is vital that rifle hunters utilize dry-fire practice to prepare for their hunts. With the cost of ammunition and reloading components higher than ever — not to mention the availability of those items lower than ever — hunters can use dry-firing drills to practice rifle handling, shooting positions, trigger control, follow-through, and other shooting skills that will make them more effective on their hunts.
If you are unfamiliar with the concept, to "dry fire" simply means to execute a full shot sequence, including a trigger squeeze, with an UNLOADED firearm.
SAFETY > EVERYTHING
Since we are discussing the actual "firing" of a rifle that should be empty, it is vitally important that we first verify that the rifle in question is absolutely — without question — completely unloaded, and all ammunition has been completely cleared from the area.
I recommend the clearing procedures below for most bolt-action rifles, but YOU must understand your firearm's operation and safety/clearance procedures, then do what is necessary to ensure a 100% safe condition and environment for any firearm you handle.

Triple-verify that you have a 100% safe firearm and environment before any dry-fire practice.
Remove the bolt from the rifle. If the rifle is equipped with a detachable magazine, remove that from the firearm and empty the magazine of any ammunition it may hold. If the rifle is equipped with an internal magazine and hinged floor plate, completely open that floor plate and ensure that the internal magazine is empty.
With the bolt removed and magazine cleared, visually inspect the chamber for any rounds and physically feel for any loaded cartridges with your finger.
Once you are sure the firearm is completely clear and all ammunition has been removed from the area, reinstall the bolt. Cycle the bolt completely and then do a final verification that the chamber is still empty.
MY FAVORITE TOOL FOR REALISTIC DRY-FIRE PRACTICE
I have been using dry-fire practice for years. At first, I assumed that dry-firing was nothing more than lying prone and practicing trigger manipulation. That type of simple dry-fire shooting can be helpful to practice trigger control, but I have learned that there are many other benefits that shooters can get from different types of dry-fire practice.
One of the things that I didn't like about dry-firing in the past is that it didn't feel anything like hunting. More specifically, aiming at a random spot on the wall was nothing like aiming at an animal. I tried a few ways to make my "view" more realistic while dry-firing but quickly realized that rifle scopes simply could not focus close enough and that their magnification became a detriment when trying to aim at photos of animals while dry-firing at home.

The DFAT from DST Precision installed on Mark's Nightforce NXS Scope
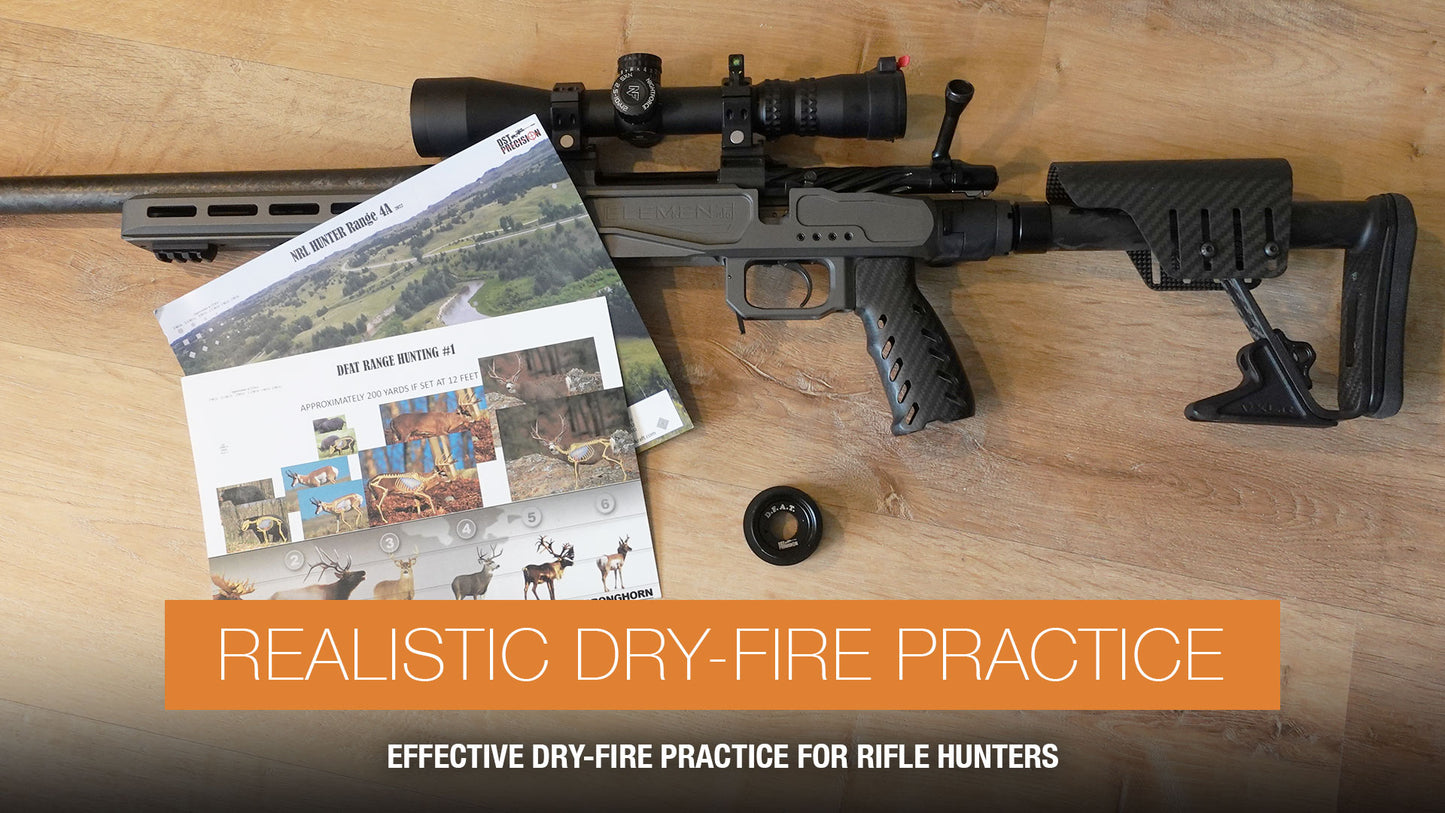
Thankfully, that problem already had a solution — the D.F.A.T. from DST Precision. DFAT stands for "Dryfire, Focus, Adapter, Training" and is a device that you install on the objective of your rifle's scope. The DFAT contains a lens that will allow your rifle scope to focus at close ranges (11' for my hunting scope) and provides a more realistic field of view — even when your scope is at maximum magnification.
Along with the DFAT device, DST Precision offers several target cards to be used with the device. Most of these target cards are meant for competitive shooters (PRS, NRL, etc), so many of the target cards are replicas of "stages" from competitions with steel targets. There are a couple of DFAT target cards with animals, which is great for us hunters. The DFAT target cards also contain a reference scale, allowing you to verify your scope's reticle (in MIL/MOA) with the reference on the target.
In addition to using DST's target cards for dry-fire practice, I also use the DFAT device on my scope to dry-fire while watching hunting footage on my computer. This type of dry-fire practice has been incredibly helpful as I prepare to hunt mountain goats for the first time this coming fall. I have thoroughly enjoyed watching goats through my rifle's scope, waiting for the right shot angle as goats move and feed in the video, and then dry-firing on a goat when I get a shot opportunity.

The view through the DST while watching mountain goat footage and dry-firing.
BASIC BENEFITS OF DRY-FIRE PRACTICE
Basic might not sound interesting, but the basics — or as I should call them, the "fundamentals" — are extremely important. Dry-fire practice will give you the "reps" behind the rifle to make those fundamentals a habit.
The fundamentals I am referring to are things like head position and cheek weld on the stock, trigger hand position, trigger squeeze, follow-through, and the cycling of the bolt. Depending on your scope setup, I would also include the fundamentals of dialing turrets and/or practicing holds with your reticle.
Dry-fire practice also provides an opportunity to practice breathing techniques, and it is also a great time to find and use your natural point of aim to hold on target.
Unfortunately, dry-firing alone won't teach you HOW to do these fundamentals properly. I highly suggest taking formal training with qualified instructors. Alternatively, shoot under the watch of a friend that has more experience than you do. If you have to learn on your own, then get online and look for resources from experienced shooters, then video yourself to see if you are truly doing what you think you are as you work with your rifle. Use dry-fire practice to make proper techniques into a habit.
FIX YOUR FLINCH
An inherent benefit of dry-firing is that you are getting used to "shooting" the rifle without the noise and recoil of sending a bullet downrange. When you begin to dry-fire, you may find that you have a flinch. Or perhaps you don't notice an actual flinch, but you discover that you have increased stress or anxiety (via muscle tension, increased heart rate, or quicker breathing) as you get in position and prepare to execute a "shot" while dry-firing.
Dry-firing will naturally train you (even at the subconscious level) to execute the "process" of a shot without anticipating the recoil and sound that happens as a result of the process. When you build good habits in your dry-fire practice and focus on the process of executing a shot, you can take that same focus on the process to your live-fire shooting. If you do, you will shoot with more consistency and accuracy — and with less anticipation of, or reaction to recoil.

Using a DST animal target in the garage to dry-fire from a sitting position with Wiser Precision Quick-StiX for support.
THE IMPORTANCE OF POSITION
Just as shooting from the bench at the range isn't realistic practice for hunting, remaining in a single position for dry-fire practice isn't realistic either. Beyond reinforcing the fundamentals, the biggest benefit I have received from dry-fire practice is learning about shooting from different positions.
Your dry-fire practice shouldn't just be about shooting from positions — it is about learning how to effectively get into those shooting positions.
Don't just dry-fire prone off of a bipod; dry-fire prone while shooting over your pack. Dry-fire from seated and kneeling positions using your pack or shooting sticks. Get into standing positions with the use of a tripod. You can also mimic the use of "natural support" that you find in the field. For example, use a door jamb in your home in the same way that you may use a small tree in the field.
When shooting from all of these different positions, pay close attention to how you can quickly and efficiently create the most stability in that position. Create some scenarios where you have your pack on, then you "spot an animal" and have to get set up to execute a shot from different positions and using different types of support. Again, only do this type of practice in a completely safe environment, with a triple-verified empty rifle, and in an environment that has no live ammunition accessible.
Pay close attention to your body position and evaluate if any changes either increase or decrease your stability. As you are in these different shooting positions, pay close attention to how much your reticle is moving on target. Again, this is where having the DFAT becomes extremely valuable — allowing you to see how changes in your position affect your ability to keep the reticle within the vital zone of the animal target that you are using for your dry-fire practice.
Through this type of positional dry-firing and the evaluation of my reticle movement, I have personally discovered some minor changes in my body position that had major benefits for my stability, and therefore, effectiveness in the field.
As you try different positions in your dry-fire practice, also remember to change angles to simulate uphill and downhill shots. Do not position your targets so that you are always shooting parallel to the ground. Raise and lower the target to create angled shots and can evaluate how you need to change your support and/or body positions to shoot most effectively at those uphill and downhill angles.
EMPTY CHAMBER, FILLED TAG
Hopefully, this information about dry-firing will provide you with the information and inspiration to take your at-home rifle practice to the next level. I fully believe that if you spend more time dry-firing on an empty chamber to practice good shooting fundamentals from realistic shooting positions, then you will have a much better chance of filling your tag on your next rifle hunt.
Mark Huelsing is the host of the Hunt Backcountry Podcast and works at Exo Mtn Gear — though he's never been able to figure out his job title. Connect with Mark by sending him an email (mark at exomtngear.com) or DM @MarkTheFark on Instagram.
To follow along and receive future articles in this series, sign-up to receive email notifications from Exo Mtn Gear. You can also view all articles in this series at the SEAK Adventure series archive.